
Tera Online Guide PvE Warrior DPS Build
Tera Online Guide PvE Warrior DPS Build.
The warrior is a light armored class which specializes in a pair of twin swords with melee offensive damage-dealing capabilities.
The main traits of the warrior are agility and fast execution skills. Although not the best when it comes to taking a hit, the warrior specializes in great dodging skills thanks to its fast movement speed to avoid getting hit.
Korean name for class is geomtusa (검투사) or gladiator. Gladiators who fought with twin swords were known by name Dimachaerus in Ancient Rome.
Guide PvE Warrior – Scythe
50% of your total DPS is contributed by Scythe, your highest damage dealing skill and highest contributing overall DPS.
Scythe crit cap for 100% crit chance is 240 crit factor this patch. Always try to aim for that number, but do not exceed it.
Crit rate’s value diminishes significantly after you hit the crit cap because more crit won’t affect Scythe, it will only affect your other skills which is around 55-60% of your total DPS.
This means that building power after you reach the crit cap is the right thing to do because it affects all your skills.
Guide PvE Warrior – Crystals
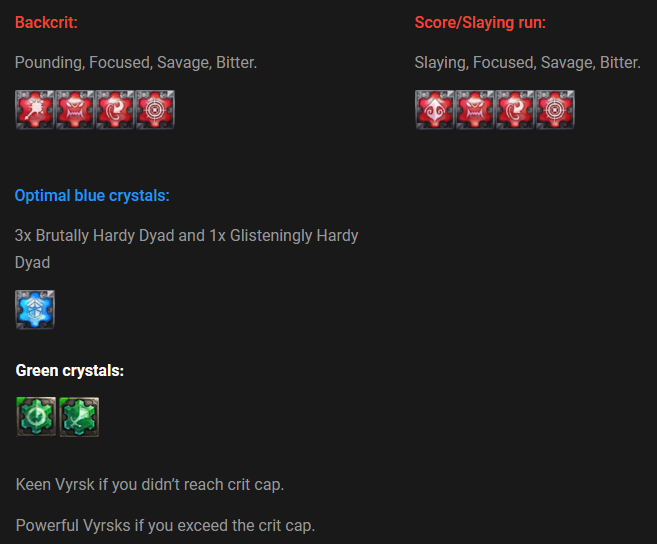
Keen Vyrsk if you didn’t reach crit cap.
Powerful Vyrsks if you exceed the crit cap.
Guide PvE Warrior – Gear
Weapon
Weapon:
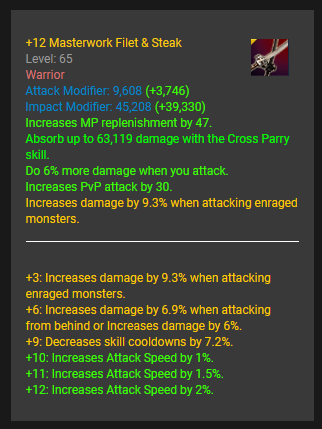
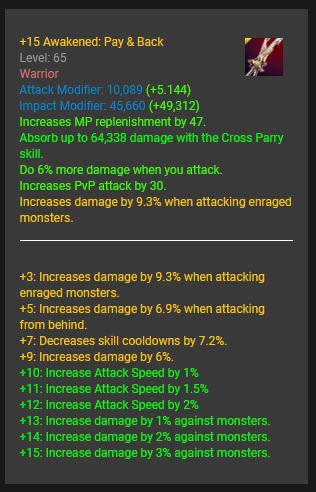
Top line roll: Increases damage by 9.3% when attacking enraged monsters.
Explanation for top lines:
There are 4 options for your top line roll:
- Increases damage by 9.3% when attacking enraged
- Decreases skill cooldowns by 7.2%
- Increases attack speed by 9%
- Increases crit factor by 18.
The enraged roll is the best choice for all players regardless of ping.
Skill cooldown is only viable if you have ridiculously low ping. There are a lot of animations locks at the end of warrior’s skills, which means that the you will spend less time in animation locks if you have low ping. As a result, higher ping players will spend more time in animation locks, which results in more downtime in their skill usage.
This means that higher ping players will not benefit from this roll because the animation lock time between their skill will make up for the reduced cooldown time on their skills.
On the contrary, a low ping player might be able to burn through their skills efficiently with the CDR roll because the animation lock time between their skills are significantly lower, so they can cast more skills in the same time frame compared to a high ping player.
Another thing to consider is blade draw resets. By resetting your blade draw, you’re essentially not utilizing your CDR roll (as the reset nature is independant from CDR).
Even with the new warriore revamp, double CDR is still not optimal. With the extra attack speed buff we got on traverse cut, it is harder to manage rotation, but it’s still doable.
As I explained earlier, everytime you reset your blade draw, any CDR stats you have is basically useless, which means that if you had the choice between Flat damage or Skill CDR, it’s always better to go for skill CDR. Without skill CDR roll, you will be using slightly more fillers which is fine, because with the buffed deadly gamble, most of your damage will come from that.
With optimal party setup and consumables, you can expect to hit more than 8m/s with enraged roll during your first Deadly Gamble at the start of the fight. You don’t need extra skill CDR for optimal Deadly Gamble rotations either.
Attack speed is an interesting roll since it’s more or less the opposite of the skill CDR roll.
Although not always true, high ping players will benefit more from this roll, because they will be able to go through their rotation without running out of skills to use as opposed to a low ping player who would burn through their skills quicker and end up with no skills left to use.
Basically, we can say that a low ping player has a lot of attack speed and a high ping player has a lot of CDR based on what I have discussed earlier.
In conclusion, a high ping player can roll attack speed to get the “same ping” as a low ping player (won’t work if your ping is in the 180s), however, keep in mind that you will lose the enraged roll line.
Crit factor roll is bad.
Bottom line rolls:
- Increases damage by 9.3% when attacking enraged monsters
- Increases damage by 6.9% when attacking from behind
- Decreases skill cooldown by 7.2%
- Increases damage by 6%
Explanation for bottom lines:
All DPS classes in this game will roll the basic damage increase on the bottom lines of their weapon since they are vastly superior to the other rolls. Some say that crit power is a viable fourth roll since scythe has a 100% crit chance (assuming you hit the crit cap), but it is not optimal.
If you are using full red dyads and a crit power VII scroll, your crit power should be at 8.10. By adding 0.3 crit power to that total amount, you are only increasing your crit damage by 3.7%.
Attack speed as a fourth roll is completely out of the question, because its value is halved.
It gives you 4.5% which is half of the top roll compared to the CDR roll which retains the same value as the top roll.
Crit factor roll is not a viable fourth roll, since you are able to obtain crit factor easily from other sources such as accessories as opposed to skill cooldown reduction which is only available as a roll or as an etching (Energetic etching).
In other words, cooldown reduction is the best fourth roll as its utility outweighs every other fourth roll, because it will allow you to use more skills in a fight (which will allow you to build your Edge faster).
Chest
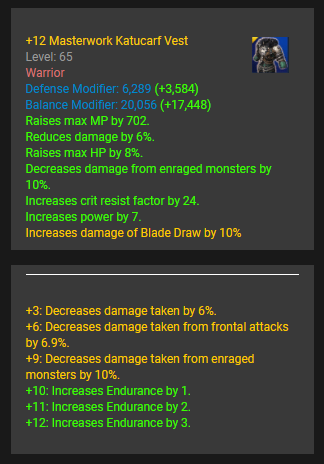
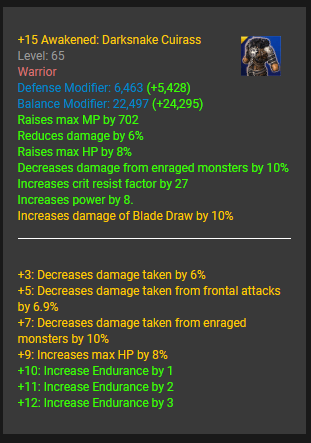
Top line roll: Increases damage of Blade Draw by 10%.
Explanation for top line roll:
Some may argue that Blade Draw cooldown is a viable chest roll, however, it is only useful to a certain degree.
When you reset your Blade Draw, cooldown is completely useless as the chance to reset your Blade Draw is independant from your CDR. In other words, the cooldown roll is useless when resetting your Blade Draw which happens 50% of the time. This means that the cooldown roll is approximately 50% as effective.
On the other hand, Blade Draw damage is much better as you will always be using the roll to its full potential.
Guide PvE Warrior – Etchings
Choosing the right etchings for your warrior can be quite difficult, because you will benefit from all three types of etchings.
Energetic etchings:
Energetic etchings are especially good on warrior because it gives you a lot of attack speed which results in fewer animation locks.
The cooldown and attack speed are both useful, they synergize very well with each other. The attack speed will allow you to cast your skills faster, which means you will burn through your skills faster resulting in you having to use more filler skills.
However, the CDR from the etchings will counteract this. This roll is especially useful for high ping players. In other words, with energetic etchings, you will be able to cast more skills in the same time frame as a warrior that does not have any energetic etchings.
Although, be aware that running double energetic will more or less affect your dps. You lose too much crit/power by doing that. Having 1x energetic will already help you a lot with you animation lock problems, but having 2x energetic won’t really make your animation lock problems better unless if you have some serious ping issues.
The only real benefit of running double energetic at this point is being able to cast more skills in a certain time frame. Also, keep in mind that if you want to min-max your warrior, you would have to at least drop one energetic etching.
During Deadly Gamble, you will have Adrenaline Rush (20 attack speed), Lein’s root beer (20 attack speed) and Quatrefoil Brooch (12% attack speed). This means that you have so much attack speed that you will not even see a difference if you had energetic etchings.
In addition, since Deadly Gamble halves the cooldowns of your skills, the cooldown gained from the etching is almost nil as your rotation during this time will not require additional cooldown if you do it right.
The only reason why you would go for one energetic etching is to help you with your animation locks when outside of Deadly Gamble.
Pumped etchings:
Pumped etchings are a viable choice for warriors. If you’ve hit the crit cap on your scythe (which will be discussed later) then getting this etching would be the most logical thing to do.
However, it is really hard to hit the crit cap on scythe if you have mixed jewelry (power and crit), it requires you to be completely geared (gold crit inner, Quatrefoil Brooch, perfect jewelry roll) and you must have a mystic in your party too (which grants you a 2.1x base crit boost).
You can however chose to go with double crit jewelry and get this etching. However, by running double crit jewelry, you will exceed the crit cap on scythe when running with a mystic which makes you lose a lot of dps. In other words, the optimal setup for pumped etchings would be with mixed jewelry and a mystic.
In conclusion, if you want to min-max you warrior, you should choose this etching.
Keen etchings:
Trash, especially with the new Scythe glyph.
In conclusion:
1x energetic 1x pumped: If you want to min-max but you want less animations locks or if your ping is somewhat high.
2x keen: ???
2x pumped: If you want to min-max if you have ridiculously low ping (sub 10 ms) or if you don’t care about animation locks.
2x energetic: If you have insanely high ping or you want to get rid of animation locks (needs more testing) or if you like high attack speed.
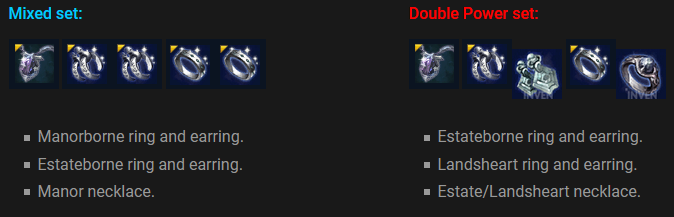
Guide PvE Warrior – Jewelry
I’ve tried double power set and mixed set, the DPS difference is neglieable in my opinion. The only way double power set would be better is if you get extremely lucky with you blade draw resets and blade draw crits during Deadly Gamble.
Guide PvE Warrior – Brooch
You have 4 choices for your brooch: Empowered, Quickcarve, Quatrefoil, and Marrow. Marrow and Quatrefoil are the best brooches, Empowered comes in second and Quickcarve comes in third.
One big misconception about warriors is that Quickcarve trumps Empowered. During Deadly Gamble, having more attack speed helps, however, it is not necessary for an optimal rotation.
One big problem with Quickcarve is that it also gives you 50 Crit factor which is essentially useless during Deadly Gamble as you already gain 1.5x Crit Factor (which is around 500 crit factor). Also, since you’ve already exceeded the crit cap on Scythe, crit factor’s value diminishes significantly compared to power.
After you hit Scythe’s crit cap, crit factor becomes less useful, so the A-speed from the Quickcarve brooch is the only useful part of it. Basically, the only useful thing you gain from Quickcarve is the 12% attack speed. Having more attack speed will help you chain your skills faster, but it only helps your dps a lot, because it will only help you cast your skills faster.
You have the potential to do one extra scythe during Deadly Gamble compared to Empowered brooch, but it will totally depend on your Blade Draw resets.
Empowered brooch is superior to Quickcarve because it increases the damage of all your abilities (compared to Quickcarve which does not increase the damage on your hardest hitting skill: scythe). The main reason to go for Empowered brooch is for increased damage on scythe.
Scythe is your hardest hitting skill (consisting of around 40-45% of your total DPS) and it also scales extremely well with power (because it’s base damage is so high if you use it at 10 Edge).
The crit factor gained from Deadly Gamble synergizes really well with the power gained from an Empowered brooch, as you will crit more often and you will deal a lot more raw damage on all of your abilities.
If you have a Quatrefoil Brooch, you can replace your Empowered brooch with it. Quatrefoil is a combination of Empowered brooch and Quickcarve, making it extremely powerful.
Note: Having a gold Quickcarve Brooch is a good idea for high score runs, since you can use two brooches in a fight (also because you cannot double brooch an empowered brooch and a quatrefoil brooch as they share the same cooldown). Have your Empowered/Quatrefoil Brooch as your default preset.
Right before the fight, switch your brooch with the other one and activate your Quickcarve Brooch.
Immediately after, switch back to your original preset and activate your second brooch later during the fight. Do not activate both brooches at the same time, your Empowered/Quatrefoil Brooch will simply overwrite the effect of your Quickcarve Brooch.
Guide PvE Warrior – Main Skills
Warrior is maybe the most flexible class in TERA. Warrior can be played as offense or damage dealing class, or as tank.
For these roles warrior has two special modes: Assault Stance Assault Stance and Defensive Stance Defensive Stance. Warrior starts with no stance and either has to be switched on, and both provide bonuses for the role.
Combo Attack
Strike one or more targets in front of you, and gain MP with each hit. Successive strikes do more damage, up to four hits, with the fourth hit dealing substantially more.
Explanation:
Combo Attacks are your “auto attacks”. You should only use this skill as a filler if you have 0.5 seconds left to wait for a strong combo. It also restores 32 RE on the first strikes, 34 on the second strikes, 38 on the third strikes and 10 on the fourth strikes.
Glyph of Threat (5 points): Provides 5% additional aggro.
Not useful, even for tanks.
Glyph of Spirit (2 points): Increases MP replenishment by 35%
You do not benefit enough from this glyph, because you rarely use Combo Attacks.
Glyph of Sap (5 points): 5% chance to stun target for 2 seconds.
You do not use your Combo Attack often enough during your rotation, so the chance of proc’ing this glyph is almost nil. Also, most bosses are immune to CC unless they need to be stunned for a particular mechanic in which case you should use your other stun skills such as Backstab, Reaping slash, Battle cry or Staggering Counter.
Evasive Roll
Dodge your enemy’s attack.
Explanation:
Evasive Roll is one of your main I-frames. It also acts as an animation canceller and it chains into Scythe. You are invincible during the animation of the skill and also for a brief amount of time after its animation. It consumes 500 resolve every time you cast it, which means you can do 3 rolls if you have full RE.
Glyph of the Swift (3 points): 40% to increase Attack Speed by 15% for 10 seconds.
The likelihood of activating this glyph during a fight is very high as you use Evasive Roll often. Also, since this glyph’s uptime is quite high, you should expect a lot less animation locks, which helps significantly.
Glyph of Restoration (4 points): Immediately restores 3% of total HP for the next chain skill: Poison Blade.
Not good.
Glyph of Unending (3 points): Reduce RE cost by 120.
You use Evasive Roll quite often, which means that you run out of resolve quite often. This glyph will help you manage it by reducing the cost of Evasive Roll to 380 RE. This glyph has the potential to save your life.
Torrent of Blows
Swing your swords in a wide arc, drawing high aggro from surrounding enemies. You take only half damage while using this skill, and are more resistant to knockdown and stagger. Adds frontal block effect,
Explanation:
This is a tank skill. You do not want to use it unless you must absolutely facetank a hit as it acts as a block and reduces dmg which means you can survive hits which would otherwise kill you. It restores 182 resolve.
Rain of Blows
Execute a flurry of sword swings while advancing on your foe. You take 30% less damage while using this skill, and more resistant to knockdown and stagger. Activates faster if used after Combative Strike, Pounce or Cascade of Stuns.
Explanation:
Rain of Blows deals decent damage (~10% of total DPS). You generate one edge (2 during Deadly Gamble) on the last hit of the skill. It hits 7 times and the damage distribution is the following: 2-1-1-1-1-2-2. It is recommended to chain it from Combative Strike most of the time, but on rare occasions when your CS is not up and the only thing you can do is RoB, you can chain it from Cascade of Stuns.
You do not want to chain it from pounce, because Cascade’s cast time is faster than pounce unglyphed, which means that if you want to use pounce, you must glyph it.
This means that you need to “waste 2 points” for the attack speed glyph on Pounce. You can chain RoB into Scythe and Reaping Slash. You don’t need to finish the skill’s animation to chain it. RoB restores 14 RE on each hit (98 total RE).
Glyph of Power (4 points): Increases skill damage by 25%
Since you use RoB quite often during your rotation, this glyph will help you deal even more damage.
Glyph of Restoration (4 points): Restores 0.5% of your total HP on each successful hits (total of 3.5%).
The heal gained from this glyph is almost negligible. If you are low in HP often, then learn to I-frame or use potions.
Battle Cry
You warlike shout draws high aggro from enemies within 10m, and may stun them.
Explanation:
This skill is mostly used by tanks, however, you can still use it to stun bosses if required.
Assault Stance
Increases Power by 18 and Crit Factor by 55 and skill damage by 10% while attacking monsters. However, your Endurance decreases by 10%. You can use only one stance at a time.
Explanation:
Since we are always DPS’ing, it is important to always have A-stance up all the time. It provides a huge boost to your overall damage. You must re-cast this skill when logging in.
Defensive Stance
Increases Endurance by 25% and Balance Factor by 30. Attacks draw 120% more aggro, and you are immune to push-back from monsters, except for certain special attacks. You can use only one stance at a time.
Explanation:
This stance is reserved for tanks, unless if you want to use infuriate. Casting infuriate will lock you in D-stance for 3 minutes, so you should only use it when the boss is nearly dead when you need an enrage for the final burn.
Death From Above
Become invincible while executing a surprise blow.
Explanation:
Death From Above is also an I-frame. It generates 1 Edge and does decent damage (although it should only be used as an I-frame, not as a damage skill). It is also an animation canceller.
Keep in mind that you are only immune to damage during the animation of the skill and it also has an animation lock at the end which cannot be cancelled by evasive roll. This means that you can potentially die after you DFA if you are not cautious. Death From Above restores 180 RE when you cast it.
Glyph of Energy (2 points): Decreases cooldown by 30%.
Having DFA up more often is nice; however, you can play without this glyph. Useful for learning dungeons.
Glyph of the Swift (3 points): 50% chance to increase attack speed by 15% for 10 seconds.
This glyph is similar to Evasive Roll’s. Having more attack speed helps you a lot. It is not necessary to pick this glyph if but highly recommended.
Glyph of Grounding (5 points): Increases endurance by 25 for 8 seconds.
25 extra endurance is quite a bit; however, you already have a lot of defense from your gear. Also, it costs a large amount of glyph points which could be used for better glyphs.
Vortex Slash
Swing your swords in a wide arc. You can use it as a chain skill only after Evasive Roll or Death From Above.
Explanation:
Vortex Slash is an interesting skill. It can only be used after Evasive Roll or DFA during a 5 second window time to actually use the skill. You have to pay attention to your cooldowns. Vortex Slash can be chained into Blade Draw. Vortex Slash’s animation cast is extremely fast; it is a very good Blade Draw chain.
Vortex Slash is not worth using without chaining into Blade Draw as it does not generate any Edge and its damage is mediocre. Keep in mind that if you need a Blade Draw chain skill, do not intentionally use an Iframe to activate Vortex Slash as it requires too much time to do so. Instead, Vortex Slash should be used only when you Iframe an attack/repositioning and you have Blade Draw up.
Glyph of Power (4 points): Increases skill damage by 25%
A decent glyph, but not required. Vortex Slash is a situational skill, so the skill’s uptime is somewhat low. However, if you crit your Vortex Slash, it does deal a significant amount of damage.
Glyph of Persistence (4 points): 30% chance to eliminate cooldown.
This glyph is not that good to be honest. As stated earlier, the only moment you should use Vortex Slash is when your Blade Draw is available. This means that you only have a 15% chance to use your Vortex Slash twice in a row with Blade Draw (Your Vortex Slash and your Blade Draw has to reset once).
Also, if you do happen to reset Vortex Slash, you must re-activate it with Roll/DFA, which means that you will most likely never be able to use double Vortex Slash in Fight.
Pounce
Jump to a target and slow the target by 50% with a slash. You take only half damage while using this skill.
Explanation:
Pounce is a filler skill. It can chain into Traverse Cut (don’t use it to do that though, it’s bad since it does not generate any Edge) and into Rain of Blows. You should only use Pounce to chain it into RoB when your CS is not available. Also, since Cascade of Stuns’ cast time is shorter, you must glyph the attack speed on Pounce to make it worth it since Pounce’s damage is also quite low. Overall, I would suggest to never use this skill unless you absolutely need to absorb damage (if you are out of RE and DFA is on cooldown).
Glyph of the Swift (2 points): Increases attack speed by 30%.
You must take this glyph if you want to use pounce.
Glyph of Energy (2 points): Decreases cooldown by 20%.
Useless glyph as you do not use Pounce enough to benefit from this.
Traverse Cut
Make 3 quick lunges to the front. Activates faster and attacks up to 13 times if you first use Pounce, Poison Blade or Combative Strike. Increases your Attack Speed by 0.9% per successful hit, and the effect stacks.
Explanation:
Traverse Cut is extremely crucial for optimal DPS. It increases you attack speed immensely. The Attack Speed buff can stack up to 11.7% and lasts 27 seconds. You can refresh the duration of Traverse Cut by simply casting the first hit of the skill (not necessary to apply all 13 hits again).
You should aim to have an uptime of 95-99% on this skill. If you Traverse Cut without chaining it, it will restore 44 RE on each of the 3 hits. When chained, it will restore 10 RE on each of the 13 hits. Traverse Cut is an important skill during your rotation, because it allows you to chain into Blade Draw.
Glyph of Lingering (2 points): Increases effect duration by 50%.
Decent glyph for its cost.
Glyph of Brilliance (2 points): Reduces MP cost by 75.
Not required.
Cross Parry
Block frontal attacks with your crossed swords. Damage blocked depends on your weapon’s stats. Lasts as long as the skill button is held down. Allies behind you also get reduced damage. Can only be used while in Defensive Stance.
Explanation:
Cross Parry is mostly a tank skill because it requires D-Stance to be able to use the skill. However, when you’re DPS’ing, you can switch to D-Stance to Infuriate the boss when he’s nearly dead to extend the enrage time on the boss.
The damage you lose from not having A-Stance will be compensated with your party’s overall DPS being higher because of your infuriate. In the rare occasion that you will use Cross Parry, remember that you can “block cancel” your skills by cancelling the end animation lock of each skill (excluding chain skills) which will allow you to fit in more skills than usual. Of course, if your tank dies, you can switch to D-Stance to grab the boss’s aggro while your healers try to resurrect him.
Glyph of Pumped (4 points): 30% chance to increase power by 15% for 10 seconds on a successful block.
Only useful for tanks.
Guide PvE Warrior – Rotations
The hardest part about warriors is the rotations. Everything is based around your Blade Draw resets, which means that you must adapt quickly in order to maximize your damage. Your goal as a warrior is to stack up Edge with the best Blade Draw chains available and the best Edge generation skills available to finally Scythe at 10 Edge.
Every skill’s value is different depending on its cast time, damage and Edge generation potential. The prioritization list will factor in the cast time, damage and Edge generation potential of each combos.
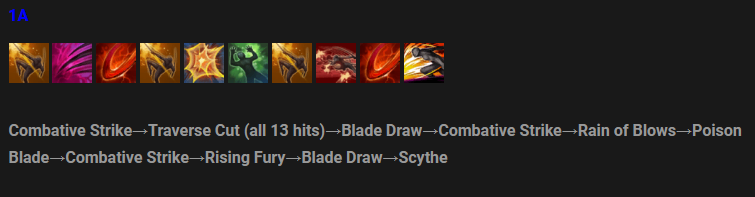
Basic Prioritization list:
– Charging Slash→Blade Draw (3 Edge)
– Vortex Slash→Blade Draw (2 Edge)
– Combative Strike→Traverse Cut→Blade Draw (3 Edge)
– Poison Blade (2 Edge)
– Rising Fury→Blade Draw (3 Edge)
– Combative Strike→Rain of Blows→(Reaping Slash) (2 or 3 Edge)
– Combative Strike→Poison Blade (3 Edge)
– Combative Strike→Reaping Slash (2 Edge)
– Cascade of Stun→Rain of Blows (1 Edge)
This is a basic Prioritization list you should follow, however it’s way more complicated than this. Warrior’s rotation is based around that, but there are even more advanced combos that you can do depending on the situation. Being able to manage your Edge efficiently is key.
It’s easier to count your Edge if you group associate combos with a certain amount of Edge generated. One additional combo would be:
Poison Blade→Traverse Cut→Blade Draw
This combo should only be used under a specific circumstance, when you’re at 6 Edge. Now, we want to combine all these combos to form rotations. The following rotations will only work if you have 1 cooldown weapon roll, Battle Nostrum VI, proper glyphs and at 0 Edge.
Guide PvE Warrior – Main DPS rotations
Obviously, sometimes you can’t always apply these rotations during the fight because of Cooldown, so in those situations, you want to improvise by using filler skills that generate Edge.
These rotations are guidelines to be followed when the opportunity allows it; you cannot always use x rotation specifically during a fight. In other words, you can make up your own rotations based on the basic prioritization list.
Obviously, there are way more possible rotations than what I have listed.
If you start a fight without Backstab and your Blade Draw does not reset after Traverse Cut, then this rotation is the best as it optimizes your damage output even without Blade Draw and it is also quite fast to execute.
However, you should always start a fight with Backstab as it allows you to position yourself behind the boss very quickly without needing to use any Evasive Roll or mobility combos. In certain circumstances where it is necessary to save your Backstab, you can use this rotation.
If you do not have a ninja in your party to Smoke Bomb the first curl of Shandra Manaya, then you need to use this rotation at the start of the fight.
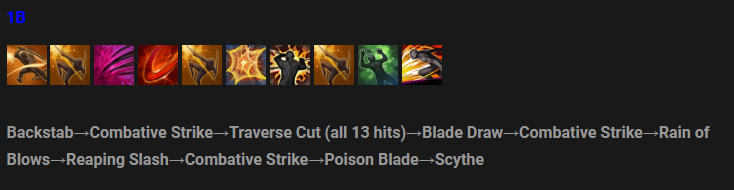
This is the best rotation to use at the start of the boss when your Blade Draw does not reset. Backstab is a great skill, as it is very fast, allows you to position yourself right behind the boss and it also generates 1 Edge. If you glyphed your Backstab for the extra Edge, then you don’t need to use a second Combative Strike after Reaping Slash.
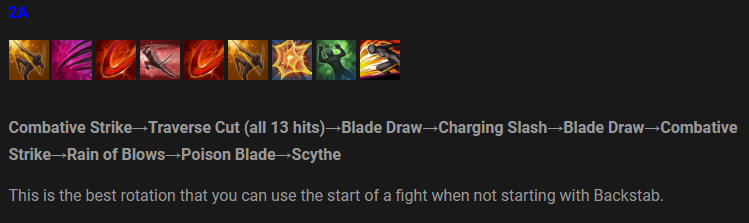
This is the best rotation that you can use the start of a fight when not starting with Backstab.
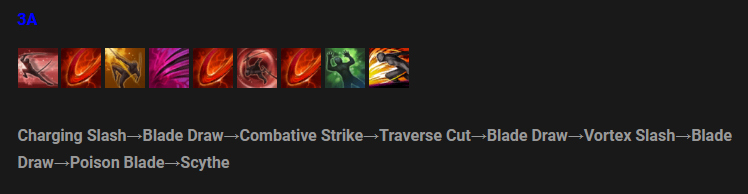
This is the best rotation when you have Vortex Slash available. This rotation is slightly better than 3B, because by using Blade Draw before Poison Blade, you will have your Blade Draw up faster for your next rotations. It doesn’t matter in what order you use Vortex Slash, because we do not use it off cooldown.
Which means that Vortex Slash’s cooldown is unimportant in this case. However, since Blade Draw is a high priority skill, you must use it off cooldown to deal optimal damage, which means that extending your Blade Draw is counter-intuitive, because you’re extending your damage potential.
The order in which you use Blade Draw is extremely important. In other words, use Blade Draw as soon it is off cooldown.