
Tera Guide Valkyrie Female Castanic Melee Damage Dealer
Tera Guide Valkyrie Female Castanic Melee Damage Dealer.
The valkyrie is a light armored class which specializes using her 7 runemarked Runeglaive to mark her enemies for death with close ranged offensive damage-dealing capabilities for effective crowd-control and burst DPS.
The class is available to Castanic females and Elins.
Korean name for class is wolgwangmusa which literally means Moonlight Warrior. Fan translations used name Lunar Dancer before official name. Name “Valkyrie” was selected on RU TERA after a community poll. En Masse originally picked name “Paragon” for the new class, but the TERA community didn’t like the name.
In March 2017 poll was opened on TERA forums about the name with five choices.
Class was released in NA on April 11th 2017

Tera Guide Valkyrie – Overview
Interestingly, the Valkyrie’s weapon Runeglaive has the highest Attack modifier among all the class weapons, beating even the Berserker’s Axe. As for the reason behind Leather armor, the developers mentioned that “[…] we decided on Glaives that focuses striking [enemies] with large blade at the tip and swinging around in spinning motion to attack, and a Leather armor to match the dexterous movements.”
Valkyrie is quite unique in terms of stats and build, which will be explained after the gearing section. Its playstyle may appeal to players who enjoy Warriors and Slayers, but it will not fail to draw attention from almost anyone.
However, the complexity of this class may vary by person– personally I’ve struggled in keeping up with back time on bosses.
Overall, this class is fair for both new player or veterans. However, the skill gap is clearly noticeable and the skill ceiling can be quite high, so the disparity between skilled and rookie can be quite steep.
With this guide, it is my goal to lessen the gap by providing a solid basis to start from.
| Base Stats | |||
| Power | 52 | Crit Resist Factor | 65 |
| Endurance | 80 | Attack Speed | 100 |
| Crit Factor | 58 | Movement Speed | 110 |

Tera Guide Valkyrie – Gear
Stat Priority
Unlike most classes, this class is not very dependent on Crit Factor, so this class will focus on building power instead.
However, you still need some crit factor to avoid the slim possibility of not critting on the most crucial skills. Here is a chart based on 100+ hits for a single skill on Hydraths in Island of Dawn:

TL;DR, Focus on building power, not crit factor.
Here, the most important skills are Shining Crescent and Runeburst.
They will have extremely high chance to crit regardless of the amount of crit factor as long as the skill hits the back of the target. If I have to talk about the flaws in this testing, they might not be accurate as I’ve noticed some glitches and I could not tell whether few hits were really from the back.
Even with disregarding those from the data, the chart above seems to match most of the time.
Having 100% on Glaive Strike and Ground Bash may sound nice, but they do not contribute to your total damage yield enough to invest glyph points. Also, the fact that they require you to chain from Leaping Slash on top of having quite a bit of animation time makes it less appealing to use compared to the other skills.
This will be covered in the Skill Rotation section.
Again, this is merely a data on Island of Dawn BAMs, which tend to have higher crit resist compared to bosses in Instance Dungeons. This shows that you can expect better results against dungeon bosses, but at worst, it should match the data.
Weapon and Armor Gear Rolls

List of Possible Chest Top Line


No doubt, Bloodflower is the superior choice.
Valkyrie’s DPS heavily relies on Shining Crescent and Ragnarok. This chest line replenishes Ragnarok Points very quickly, allowing you to activate Ragnarok faster and more often.
This also helps in using Shining Crescent because when you activate Ragnarok, it will reset cooldown on Shining Crescent as well, allowing you to use Shining Crescent twice within 10 seconds under perfect conditions.
Utilizing both of these benefits a tremendous amount of DPS in return.
Jewelry Choice and Rolls

Innerwear Choice

The recommended option is 10 Power Innerwear. However, if you feel that having extra crit factor is necessary, it isn’t a bad idea to do so since having some crit factor will provide a bit of safety when you are very low in crit factor and/or in priest party.
Crystal Choice

Some may prefer to have crit factor mixed in. It is not unusual to see Valkyrie with crit factor jewelries or crystals.
- They probably feel that they are lacking crit factor to consistently produce 100% crit on Shining Crescent and Runeburst. It isn’t a bad idea to have some crit factor while you are learning the class before going full power set-up.
- In priest party, having some crit factor is recommended (around 58.0 +62) because there is a very small chance that Shining Crescent won’t crit even from the back.
Valkyrie do not require Glistening (or Glisteningly Blue Dyads) because normally you will not have any issues with mana.
Tera Guide Valkyrie – Runemarks
Runemark basically functions just like Warrior’s Edge stacks. However, there are few differences:
- Stacks up to 7 marks on a single target.
- It can be retrieved to your character which will leave indicator below your character. There are total of 7 triangles forming a shape like a sun. Each stack will be indicated as yellow glow on each triangle, but once it is full, the indicator will glow red.
- The effect of skills depend on whether the target has the stacks or not.
Inflicting crit damage from any attack against another player or normal monsters will grant 1 Runemark to the inflicted target.
However, against bosses, Runemarks will only stack under the following conditions:

Tera Guide Valkyrie – Ragnarok Points

Ragnarok points is a third resource available to the Valkyrie class, that is generated by using skills. All skills replenish Ragnarok Points by 5 per hit, that’s without any modifiers. This means it takes 200 raw hits to fill up the gauge to 1000.
However, some skills have glyphs to increase the amount of Ragnarok Points:

Tera Guide Valkyrie – Perfect Evasion
This is currently not working properly until we get the fix from KTERA’s January 25th patch.
Another unique trait of Valkyrie is “Perfect Evation”. This is an effect given to Valkyrie when they trigger “Perfect Evasion”, just like how Perfect block works. You will see the indicator for Perfect Evasion, just like how Successful Block, Successful Counter, and Perfect Block would pop up.
| Typical Evasive Roll, but can be used twice within 4 seconds before cooldown is applied.
At a correct timing, a ‘Perfect Evasion’ can be triggered to receive a buff which guarantees crit damage on the next skill other than [Slash] within 10 seconds. |
|||||||||


The best use for this skill is for Bloodflower, this is because Evasion has a glyph that resets Bloodflower when you’ve successfully proc ‘Perfect Evasion’. If not, the other best skill would be Maelstrom, Glaive Strike, or Titansbane.
Tera Guide Valkyrie – Skills & Glyphs
Typical basic attack skill that chains itself 4 times as a combo. The fourth hit of this skill has very high chance to crit while resetting cooldown of [Leaping Slash].
- Glyph of Spirit: You shouldn’t be mana hungry in the first place.
- Glyph of Swiftness: Doesn’t make a noticeable difference.
- Glyph of Power: Doesn’t make a noticeable difference.
Resets:
Leaping Slash (on successful 4th hit)
Your one of two iframe that allows you to vault twice within 4 seconds. However, just like Brawler’s Perfect Block, this skill will proc Perfect Evasion when iframing an attack within 0.5s before getting hit. Utilizing this with [Bloodflower] improves your performance substantially.
- Glyph of Persistence: Costs too much for its effect.
- Glyph of Opportunity: Rewards you with free DPS + Ragnarok Points for perfectly avoiding an attack.
This skill has three uses: mobbing, filler, and Ragnarok Point regeneration. When [Shining Crescent] is on cooldown, you will have to use this skill instead. This is one of the two important skills needed to regenerate Ragnarok Points as quickly as possible.
- Glyph of Ardency: Free Ragnarok Points means more Ragnarok. More Ragnarok means more DPS.
- Glyph of Power: Very noticeable. This skill is usually top 3 in damage contribution.
Your very basic skill. It takes up a bit of animation, but it hits twice, leaving a Runemark when you successfully 2-hit combo a target.
- Glyph of Brilliance: You shouldn’t be mana hungry in the first place.
- Glyph of Power: Not noticeable enough.
- Glyph of Carving: Not useful enough.
Activates Chain:
Ground Bash (for 4 sec)
Glaive Strike (for 4 sec)
Very important skill to reset [Leaping Slash], but that’s all it is for.
- Glyph of Powerlink: [Leaping Slash] isn’t very powerful to make this worth it.
- Glyph of Power: Not noticeable enough.
Resets:
Leaping Slash (on cast)
One of the two most important skill for Ragnarok Point regeneration. The cooldown of this skill can be reset by a Glyph of Opportunity from [Evasion]
- Glyph of Ardency: Free Ragnarok Points means more Ragnarok. More Ragnarok means more DPS.
- Glyph of Powerlink: [Leaping Slash] isn’t very powerful to make this worth it.
- Glyph of Carving: If you can proc “Perfect Evasion” with [Evasion] enough
Requires to be chained from [Leaping Slash] and the damage isn’t very significant despite being quite decent.
- Glyph of Carving: Costs too much for its damage and crit rate.
- Glyph of Power: Damage increase is not very significant.
Chains From:
Leaping Slash
Takes quite a bit of animation to cast, but sends 30m projectile flying to camera direction (except it doesn’t go through ground. it travels straight on your character’s ground level). It also penetrates through enemies and guarantees crit if they are knocked down or airborne. Great mobbing skill, but not very useful otherwise.
- Glyph of Haste: This glyph makes the skill more useful with faster animation, but the skill itself doesn’t crit enough to.
- Glyph of Numbing: Please avoid using this in PvE.
- Glyph of Brutality: Only affects Knocked down targets.
- Glyph of Carving: Cost too much.
Resets:
Leaping Slash (on successful hit while target has at least 1 Runemark on them)
Dash forward and attack a target within 20m. Other than mobility, this skill is very useful for filler in case your rotation is messed up due to mechanics. If the target does not have a Runemark, attacking that target with this skill grants 1 Runemark.
- Glyph of Energy: You won’t really need to spam this.
- Glyph of Power: Doesn’t make a noticeable difference.
Typical retaliate. This skill only activates when you are knocked down or airborne to get yourself back up on your feet.
- Glyph of Power: No.
- Glyph of Energy: No.
Pulls enemies within 12m of a target with Runemark, stunning monsters for 3 seconds. Of course, this doesn’t work on Bosses, but the main use of this skill is for Glyph of Powerlink that increased damage of [Runeburst].
- Glyph of Powerlink: This might depend on your preference. It certainly does improve [Rune Burst] damage significantly, but some may not feel that the animation is worth it.
This skill does quite a bit of damage when it crits which can improve your DPS significantly, so you want to use this as much as possible too. This is especially useful because it generates 2 Runematks.
- Glyph of Carving: Costs too much.
- Glyph of Energy: Cooldown reduction on weapon alone is usually enough. Only invest in this if you don’t feel like its cooldown is too long.
- Glyph of Power: This skill can pack a punch when it crits.
Chains From:
Leaping Slash
This is a 3-hit combo skill that must be used consecutively within 5 seconds of each other. The third cast has high chance for knock down, and successful 3-hit combo generates 1 Runemark, reset cooldown of [Leaping Slash], as well as activating Glyph of Powerlink.
- Glyph of Energy: You will use this skill a lot, but the cooldown of this skill is low enough so you might not need it. Only invest in this if you have spare points left over.
- Glyph of Powerlink: Very crucial. It’s a free DPS boost.
Resets:
Leaping Slash (on successful 3-hit combo)
Typical backstab that staggers target on successful hit. However, it has very long range of 17m. This is the other iframe skill, but you really want to save the glyph effect for [Shining Crescent].
- Glyph of Power: One of the most broken glyph I’ve ever seen.
Resets:
Leaping Slash (on successful hit)
2-hit skill that stuns target for 2.5seconds. Not really used unless it is needed for stun mechanic or such.
- Glyph of Powerlink: [Leaping Slash] isn’t very powerful to make this worth it.
- Glyph of Energy: You won’t use this skill unless needed.
Retrieves any Runemarks left on target to self and grants 1 Runemark. It can be useful sometimes to extend [Gjallar Horn] passive as it resets the timer.
- Glyph of Energy: You normally won’t use this in combat outside of mobbing.
Leaves 6 Runemarks when successfully landing all hits. This is the quickest way to build Runemarks to use [Shining Crescent] or [Runeburst].
- Glyph of Energy: Very crucial to align cooldown with [Shining Crescent]
- Glyph of Restoration: Maybe useful when soloing such as Island of Dawn BAMs.
- Glyph of Carving: Free DPS.
- Glyph of Power: Free DPS.
Your best DPS skill that bursts tremendous amount of damage. This skill heavily determines your DPS, so you must use this as much as possible.
- Glyph of Energy: Very crucial to align cooldown with [Maelstrom].
- Glyph of Brilliance: You shouldn’t be mana hungry in the first place.
- Glyph of Power: Free DPS.
Your emergency face tank skill. This skill grants immunity to Knock down and stagger, and summons 3 orbs. Each orb will disappear when you receive damage after it absorbs 70% of the damage.
- Glyph of Restoration: Maybe useful when soloing such as Island of Dawn BAMs.
- Glyph of Energy: You normally would not use this skill.
When Ragnarok Point gauge is full, you will notice that this skill will be available for activation. Once this skill is activated, you will gain several stat boosts for 25 seconds.
- Glyph of Lingering: Longer Ragnarok, more DPS. Duration will increase by 3.75 seconds, making it last 28.75 seconds.
Resets:
All skills except [Evasion], [Retaliate], [Balder’s Tears], and [Titansbane]
Here’s an Example glyph build:
Tera Guide Valkyrie – Skill Rotations
Valkyrie’s skill rotation may feel very similar to Slayer as many skills relies on a single skill – Leaping Slash. Consider the following chart for quick view of basic rotation:
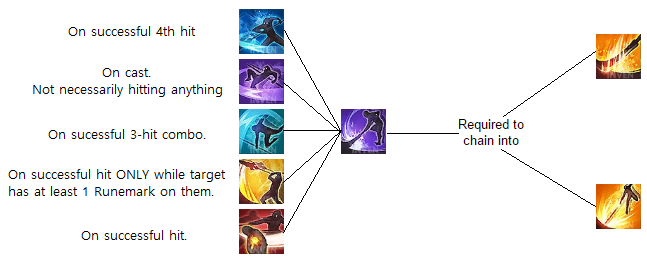
However, Ground Bash and Glaive Strike MUST be chained from Leaping Slash– they cannot be casted by itself. Also, Leaping Slash resets only when the conditions written on the left have been achieved.
| Priority List for resets |

Other Handy Tips
This class is even worse when it comes to how broken it is for mobbing after level 8.
When you have a bunch of mobs following you, simply using these two skills can clear them up easily:
This works thanks to the broken combination of Avatar Weapons granting high chance to crit, and the passive [Rune Carving], which generates Runemarks on minions and normal monsters.
After Level 34, there is a handy combination of the following skills:
By using [Reclamation] to retrieve existing Runemark on target to yourself, you can follow up with [Charge] to attack– in total, this gives 2 additional Runemarks. However, this is very situational skill– for example, when a BAM decides to knock you down and/or leap away from you while it has 4 or 5 Runemarks, this can be very useful utility wise.
Valkyrie’s wombo combo. Basically, use [Bloodflower] after “Perfect Evasion” proc when using [Evasion] to avoid attacks. Having Glyph of Persistence and Opportunity on [Evasion] along with Glyph of Ardency and Carving on [Bloodflower] makes these two skills stand out a lot. Having [Evasion] resets allows you to have more chances to proc “Perfect Evasion”.
If you have Glyph of Opportunity on [Evasion], it resets [Bloodflower]. Having more [Bloodflower] casts means more Ragnarok points thanks to its Glyph of Ardency, and since “Perfect Evasion” guarantees crit damage on the following skill (which is Bloodflower in this case), having Glyph of Carving adds 2.0 crit power on top of your crit power stats, producing more damage.